

How To Install Car Audio Deck
Installing a head unit of measurement or replacing ane can range in difficulty. Personally, I've spent as little as 30 minutes replacing a head unit, all the style upwards to 4 or 5 hours for the same chore on a unlike auto. In that location'due south a number of variables that can dictate how hard and time consuming the task really is:
- Dash and trim components – In our experience, the most difficult cars are typically german. Audi, BMW, Mercedes, Volkswagen. The dash and trim components are very stubborn and tight and difficult to remove.
- Wiring – Wiring tin vary from car to car. This really depends on the number of features that the car has. For example OnStar on GM cars, or merely an OEM amplified stereo. These are the things you lot demand to know prior to wiring your car and ordering the adapting harnesses (we'll get more into detail on this soon).
- Mounting the new caput unit of measurement – This tin be especially difficult if yous cull to DIY. Withal, in most cases you'll discover that there are adapting 'Dash Kits' from providers similar Metra and Scosche that will simplify the mounting and installation of the stereo.
At the end of the day, there are cars that I'd recommend upgrading or replacing a stereo, and cars that I would not recommend. In this guide, we'll not but walk y'all through the process of deciding whether yous should upgrade your car's caput unit we'll walk you through the process if you decide to practise it!
Should I Upgrade My Car Stereo Caput Unit?
Before you lot buy and install one of our recommended all-time car stereos or gps navigation units, yous demand to inquire yourself the following questions to make up one's mind IF yous should upgrade or replace your stereo and what kind of stereo you should upgrade information technology with.
- First question – Does your car already have an aftermarket caput unit? If this is the instance, your installation is profoundly simplified because the wiring and mounting is already done. All yous have to practice is supercede it. Notation that you may accept the alter out the wiring harness that connects into the back of the unit. In this case, just cutting and match upward the wires color for color.
- Will upgrading my head unit crusade my vehicle to lose any features/functionality? Many of the new vehicles have interdependent systems that rely on the stereo. For example, my Ram 1500 has settings for whether the horn chirps when I lock information technology, whether the locks automatically lock later a certain period of time, if the lights stay on after I lock the truck. All of this is controlled through my manufactory head unit. Many vehicles have this. If your car has features similar this that are dependent on the caput unit, I'd recommend keeping the stock stereo. If y'all're looking for more audio, you lot can practice it without upgrading your stereo.
- Does my vehicle accept multiple screens? In some cases cars have multiple screens that are interlinked. For example on many Hondas there is a head unit of measurement, then there'south a display screen that displays information from the head unit of measurement similar the radio station or the CD. Replacing the stereo may render the display useless. There are cases where adapters have been made, you'll want to research whether information technology has before you lot make up one's mind to replace your head unit. Or, if yous don't care go ahead!
- Why am I upgrading my auto stereo? If you want a subwoofer, or louder speakers, a head unit isn't your just option. If you lot want features that yous currently don't accept, like Bluetooth or an AUX input, there'south likewise adapters for that. Figuring out if a replacement stereo is the all-time option for your needs is key.
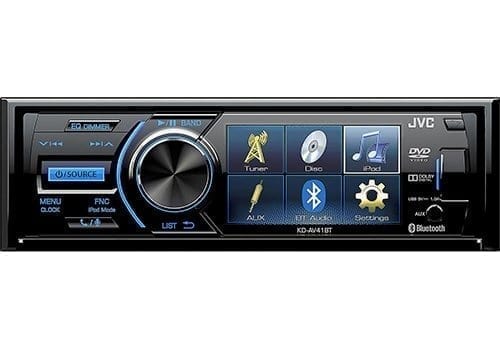
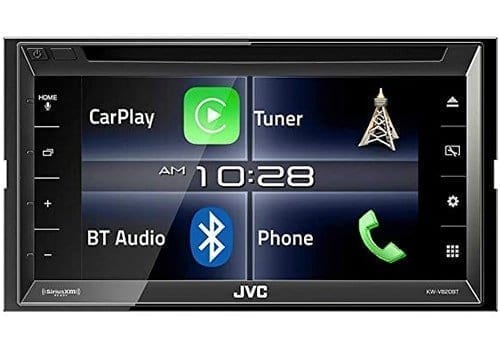
- How large is my stereo opening? In that location'due south ii main sizes in caput units: 1DIN and 2DIN. 1DIN is the smaller of the two. It can fit in both 1DIN and 2DIN openings. 2DIN is larger and is typically dedicated to units with a touchscreen and larger screens. Hither's an case of what a 1DIN (left) and 2DIN (correct) look like:
If, asking yourself all of these question, y'all nevertheless feel it's necessary to buy and install a new caput unit, here are the adjacent steps!
- Phillips and apartment head screw driver set
- Plyers
- Wire Strippers
- Wrenches or sockets (usually 8mm, 10mm)
- Dash prying tool
- Stereo removal primal (if needed)
- Volt meter
- Soldering Fe or Torch
- Solder
- Heat compress or Electrical tape
- OR Wire crimps/clamps (if you don't want to solder)
1. Removing The Car Stereo
Well, the first step to installing your new caput unit is to remove the former! To practice this, we recommend yous pop the hood and disconnect your battery before annihilation. This manner, yous don't short whatever fuses. Finding a blown fuse can be time consuming and frustrating so accept our discussion that this will save you time in the long run. Once you have done this, showtime to remove the trim from around your stereo to access the mounting screws. I've establish the trim removal instructions from Metra to be very helpful when you do this. In many cases, trim needs to be pulled in a certain management to prevent swell or breaking information technology. Metra does a not bad job at helping y'all visualize how to pull your trim off and where. Go to http://metraonline.com/, curlicue downwardly to the vehicle fit guide and enter your car. Once you've done this, click on one of the dash kits (this is the piece of plastic that you'll mount your head unit into. It replaces many parts of your trim to make a seamless fit for your new stereo). If you haven't already bought one of these dash kits, nosotros HIGHLY recommend you exercise. It volition simplify your install by 10 fold. In one case y'all've selected i of the dash kits, click on the PDF link under the "Documents" on the left. Y'all'll observe full instructions for removing your trim step by step!
Your head unit of measurement will be mounted in one of two means:
- Bolted to the dash with brackets and screws. This is the more difficult option to removing and where the Metra instructions will exist actress helpful.
- Secured with mounting sleeve and bound clips. For this type, yous'll want to purchase our recommended stereo removal keys.
Sticking and Stubborn Dash Trim
It'southward worth noting that removing trim is probably one of the more than difficult tasks in removing your car stereo. Yous're going to be lucky if you lot don't hit at to the lowest degree one trim slice that isn't a hurting. In these cases, yous actually want to apply a trim removal tool to wedge in between the gaps and gently work your way effectually the trim piece. Patience is cardinal because once you pause a trim piece, there'due south no turning back. Start in a corner and work your fashion around the piece.
One time you've removed your trim co-ordinate to the instructions, dismount your factory stereo and disconnect the wiring on the back of the unit.
2. Wiring Your New Car Stereo
If Metra or Scosche carries a wire harness for your vehicle, nosotros highly recommend purchasing one along side the dash kit. Again, you can use the same link from Metra (www.metraonline.com) to find the i for your vehicle. In the case that you can't find one, you'll need to exercise a little research on the web to find a listing of stereo wire colors on your harness and match them upward with the corresponding ones on the motorcar stereo harness. Yous can observe a diagram here of aftermarket car stereo wires. This will assistance y'all lucifer the aftermarket upward with your factory ones.
If y'all find that at that place is a custom wire harness for your car, it'due south very elementary, but match up color for color the wires from your aftermarket head unit of measurement harness to your custom wire harness for your automobile.
Connecting the Wires
There'south two options for connecting the wires that y'all tin can use:
- Soldering – For all of the professional person installs that I have washed I would solder the ii together. This ensures a permanent connection that volition never short over fourth dimension. It's more fourth dimension consuming though. Hither's how yous do it:
- Strip the two wires one/ii inch back.
- (Optional) Place one 1/2 inch of shrink wrap on one side at least four inches behind the end of the wire.
- Overlap the two exposed wires and twist the two together until they are interconnected.
- Using a soldering iron or a soldering torch, oestrus the wire and feed in your solder slowly until it absorbs into the wire.
- Allow absurd and examination the solder chore by tugging on the two wires.
- After the wires cool, move your shrink wrap back over the soldered expanse. If you lot didn't use shrink wrap, use electrical record.
- Do this for each wire until all have been connected.
- Connectors – Y'all tin use barrel connectors or crimp caps as well. This is a much more efficient mode to connect the wires merely in many cases I've seen these fail later a few years on the road. In any case, you'll either crimp the ii wires together in a clamp by placing the wires in and clamping down on the crimp clam. Or your use but connectors to insert both ends into the connector and clench both sides.
three. How to Install the New Stereo
Now that your wires are all completed you're ready to install the head unit. Connect all of the wires outset. Ensure that there are no exposed wires that may be in contact with any part of the vehicle. We recommend connecting your battery and testing the stereo out prior to fully installing it back into the dash.
In one case you've tested it (and it works!) you'll desire to add the mounting brackets to your new head unit of measurement. If you lot have a nuance kit, utilize the ones that come with the kit. If not, utilise the ones off of your mill stereo. If you have the dash and mounting kit, follow the instructions in the manual. If not, yous'll need to test where the new caput unit sits, and adjust your factory trim to brand it fit. This is normally a difficult task. I'd recommend using a Dremel to make cuts and adjustments to the plastic.
Slide the stereo into the opening in the dash, ensuring that the wires behind are tucked and not pinched. Sometimes this may take a few times when the vehicle has a tight nuance opening. Constrict the wires dorsum into an opening behind the unit.
Congratulations! You're done! Let us know y'all you did and if you accept any questions in the comments section.
Likewise exist sure to bank check out our top rated lists:
Best Single Din Automobile Stereo
Best In-Dash GPS Navigation Unit
All-time DVD/Multimedia Head Unit of measurement
Best Digital Media Receiver

Source: https://www.caraudionow.com/how-to-install-a-car-stereo/
Posted by: barnescousine.blogspot.com
0 Response to "How To Install Car Audio Deck"
Post a Comment